How To Wear Neckband Headphones: Easy Comfort Tips

Introduction
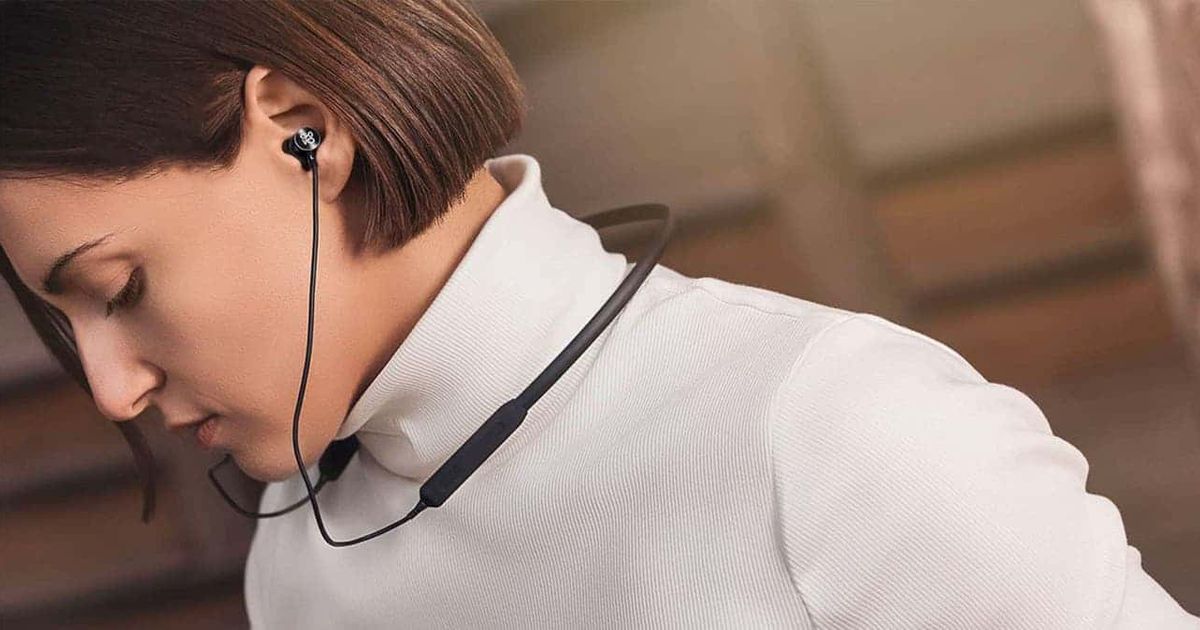
To wear neckband headphones, place the band behind your neck, rest each earbud near the correct ear, and insert or position the earbuds until they feel secure without pressure. The left earbud goes in your left ear, and the right earbud goes in your right ear. Keep the control module where you can reach it without pulling on the cable.
This guide is for people in the United States who use neckband headphones with phones, tablets, laptops, or other Bluetooth devices. It covers daily use, work calls, exercise, comfort, sound quality, cleaning, and common fit problems.

What Are Neckband Headphones?
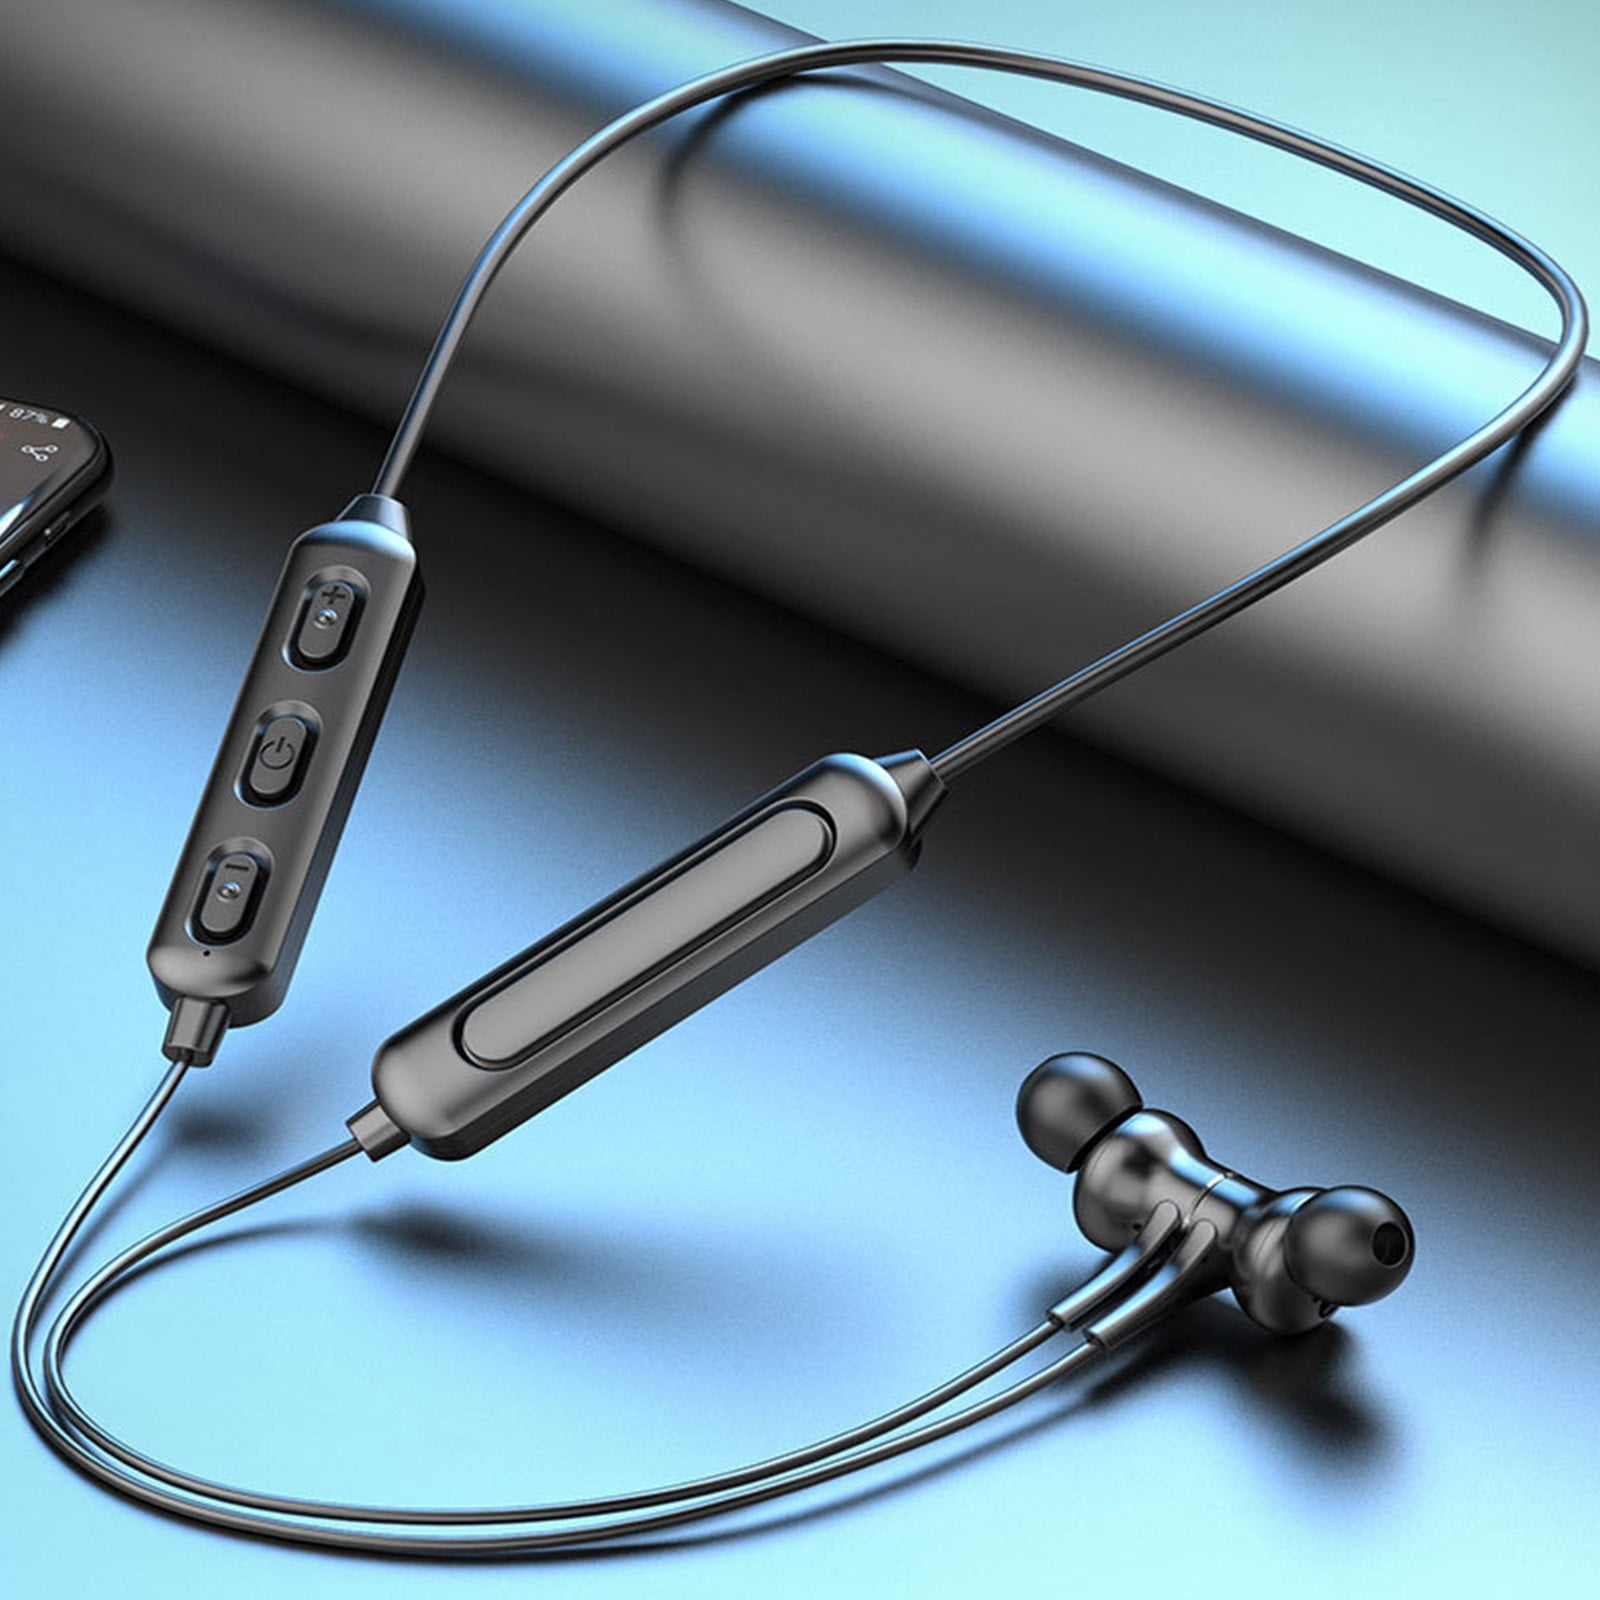
Neckband headphones are wireless headphones joined by a flexible band or cable that rests around your neck. Most models use Bluetooth to connect to a phone or computer. They may have earbuds, ear tips, microphones, buttons, and a battery inside the neckband.
The neckband serves two main purposes:
- It keeps the earbuds close to your ears.
- It reduces the chance of dropping or losing the headphones.
Neckband headphones are different from true wireless earbuds. True wireless earbuds have no cable or band between the two sides. Neckband models can feel more secure for commuting, office work, phone calls, and light exercise.
Common neckband designs include:
- In-ear neckband headphones: Ear tips fit inside the ear canal.
- Band-style headphones: Small speakers rest near or over the ears.
- Sports neckbands: These often have a firmer band and sweat resistance.
- Noise-canceling neckbands: These use microphones and electronics to reduce outside noise.
The correct wearing method depends on the design. Always check the model’s user manual for water resistance, button controls, charging, and ear tip instructions.

How to Wear Neckband Headphones Step by Step
Follow these steps each time you put on your neckband headphones.
1. Check the left and right sides
Look for the letters L and R. The left earbud belongs in your left ear. The right earbud belongs in your right ear.
Some models use different colors or shapes instead of letters. Do not force an earbud into the wrong ear. The sound may feel uneven, and the controls may sit in an awkward place.
2. Place the band behind your neck
Hold the neckband with both hands. Put the flexible band behind your neck, not under your chin.
The band should sit on the base of your neck or slightly above your collar. It should not press hard against your throat. The earbud wires should fall forward from both sides.
A good fit lets you turn your head without the band shifting. If the band slides down, adjust your shirt collar, hair, or the position of the neckband.
3. Find the control module
Many neckband headphones place the power button, volume buttons, microphone, or charging port on one side. Let that side rest where your hand can reach it.
For example, if the controls are on the right side, keep them near your right shoulder. Avoid twisting the band to move the buttons. Twisting can pull the earbuds from your ears.
4. Choose the right ear tips
If your neckband includes several ear tip sizes, start with the size already installed. Then test the fit.
The right ear tip should:
- Stay in place when you move your head.
- Block some outside sound without causing pain.
- Create a light seal in the ear.
- Sit evenly in both ears.
A tip that is too small may fall out or sound weak. A tip that is too large may cause pressure, soreness, or a blocked feeling.
Your left and right ears may need different sizes. That is normal. Use the size that fits each ear best.
5. Insert the earbuds gently
For in-ear models, use your opposite hand to lift the top of your ear slightly. Insert the earbud with a gentle twisting motion.
Do not push the earbud deep into your ear. The tip should seal the opening without causing sharp pain. If the earbud feels loose, try a different tip size rather than forcing it farther in.
For open or semi-open models, place the speaker at the ear opening. These headphones may not form a full seal. They can sound more natural but may let in more outside noise.
6. Secure the cable or ear hooks
Some neckband headphones have ear hooks, fins, or clips. Place these behind the ear or inside the outer ear as directed by the manual.
The cable should rest close to your neck and face. If it hangs loosely, it may catch on clothing or swing while you walk.
Do not wrap the cable tightly around your ear. Tight pressure can lead to discomfort and may pull the earbud out.
7. Pair the headphones with your device
Turn on Bluetooth on your phone, tablet, or computer. Then press and hold the neckband’s power or pairing button.
On most devices, open Bluetooth settings and select the headphone name. If the model asks for a passcode, check the manual. Many devices pair without one.
After pairing, play a short audio clip. Confirm that:
- Sound comes from both sides.
- The left and right channels are correct.
- The volume is comfortable.
- The microphone works during a test call.
- Buttons respond as expected.
8. Adjust the fit while moving
Walk, turn your head, and look down. The neckband should remain stable. The earbuds should not shift with each step.
If the earbuds move, try smaller or larger ear tips. If the band moves, place it higher or lower on your neck. You can also adjust the cable position around your collar.
The best fit is stable but not tight. A neckband should feel like it is resting on you, not gripping you.

How Should Neckband Headphones Sit on Your Neck?
Neckband headphones should sit behind your neck with the earbuds pointing forward toward your ears. The band should rest evenly on both sides of your neck.
Use these fit checks:
| Fit check | What you should notice |
|---|---|
| Neck position | The band rests behind the neck, not across the throat |
| Earbud position | Each earbud points toward the correct ear |
| Cable tension | The cable has slight slack |
| Movement | The band stays in place when you turn your head |
| Comfort | No sharp pain, strong pressure, or skin rubbing |
| Sound | Both sides sound clear and balanced |
A band that is too low may pull on the earbuds. A band that is too high may touch your hair, jaw, or ears. Adjust it by small amounts until the weight feels even.
If you wear glasses, place the neckband behind the glasses arms when possible. If the band presses against the glasses, try moving the band slightly lower. For long hair, keep the band under the hair if it helps prevent sliding.

How to Wear Neckband Headphones for Exercise
Neckband headphones can work well for walking, gym sessions, and other light activities. Use extra care during running or intense movement because sweat, motion, and cable movement can affect the fit.
Before exercising:
- Check the manufacturer’s water or sweat-resistance rating.
- Confirm that the neckband has a secure fit.
- Use ear fins or hooks if supplied.
- Keep the control module away from heavy sweat when the manual recommends it.
- Start with a moderate volume.
Do not assume that a model is waterproof because it is marketed for sports. Water resistance has limits. A device may resist sweat but fail after being submerged, exposed to heavy rain, or cleaned under a faucet.
After exercise, wipe the neckband and earbuds with a soft, dry cloth. Let them dry before charging. Never charge wet electronics.
For outdoor walking or cycling, keep enough awareness of traffic, people, and other hazards. Noise cancellation can reduce your awareness of nearby sounds. In busy areas, use a lower volume or one-ear mode if the device supports it.
How to Improve Comfort and Sound Quality
Comfort and sound quality depend mainly on ear tip size, earbud angle, neckband position, and volume.
Try these adjustments:
Change the ear tip size
If bass sounds weak or outside noise enters easily, the ear tip may be too small. If your ear feels sore, the tip may be too large.
Test each size for several minutes. A quick fit may feel fine at first but become painful later.
Adjust the earbud angle
Many in-ear earbuds work best when the nozzle points slightly toward the ear canal. Do not rotate the earbud sharply. Use a small adjustment.
If the earbud keeps turning, check whether the ear tip or ear fin is installed correctly.
Reduce cable pull
Keep the cable close to your neck. If the cable catches on a shirt or jacket, use the supplied cable clip. Do not tie a tight knot in the cable.
Set a safe listening level
Start at a low volume and raise it only as needed. If people nearby can hear your music clearly, the volume may be higher than necessary.
A loud setting can harm hearing over time. Lower the volume in quiet places instead of using high volume to cover normal background sound.
Use the right sound mode
If your model has noise cancellation, transparency mode, or an ambient mode, select the setting that fits the situation. Noise cancellation may help during travel, while an ambient mode may help you hear announcements or nearby people.
Do not use a sound mode as a substitute for visual awareness in traffic or other risky settings.
How to Wear Neckband Headphones for Phone Calls
Place the microphone near the upper chest or collar area, where it can pick up your voice without rubbing against clothing.
Before an important call:
- Confirm that the headphones are selected as the audio device.
- Test the microphone in your phone or computer settings.
- Keep the microphone opening clear.
- Avoid covering it with a scarf, collar, or hair.
- Move away from strong wind when possible.
If the other person hears rustling, the microphone may be touching clothing. Secure the control module or microphone with the included clip. If the voice sounds distant, check whether the microphone is facing the wrong way.
Some neckband headphones switch automatically between music and calls. Others require you to choose the headphones from the call screen. The exact behavior depends on the model and device.

What to Do When Neckband Headphones Do Not Fit
If the headphones do not stay in place, check the ear tips first. Fit is the most common cause of movement.
Use this troubleshooting order:
- Confirm that the left and right earbuds are in the correct ears.
- Remove and reinstall the ear tips.
- Try a different ear tip size.
- Adjust the neckband height.
- Check for cable tension or clothing snags.
- Add ear fins or hooks if the model includes them.
- Clean earwax or dust from the earbud mesh.
- Review the model’s fit instructions.
If one side sounds quieter, the earbud mesh may be blocked. Earwax can reduce sound even when the Bluetooth connection works normally. Clean only as the manufacturer allows. Do not push a sharp object into the speaker opening.
If the headphones hurt, remove them. Pain is not a sign that the earbuds need to be inserted more deeply. Try a different tip, a different fit, or a different headphone style.
Stop using the headphones if you notice sudden hearing changes, persistent pain, drainage, dizziness, or ringing that does not improve. A qualified health professional can help assess ongoing ear or hearing symptoms.

Common Mistakes to Avoid
Several small mistakes can make neckband headphones uncomfortable or unreliable.
Wearing the band in front
The neckband belongs behind your neck. Wearing it under your chin can pull the earbuds forward and place pressure on your throat.
Using one ear tip size without testing
The same size may not fit both ears. Test the available sizes and use the most comfortable combination.
Pushing the earbuds too far in
Deep insertion can cause pain and may irritate the ear canal. A proper seal should come from the ear tip, not force.
Ignoring the control side
If the controls hang behind your shoulder, you may pull the neckband when changing the volume. Position the control side where your hand can reach it.
Charging the headphones while wet
Sweat and water can damage electronic parts. Dry the device before charging and follow the manufacturer’s care instructions.
Sleeping with neckband headphones
The band, earbuds, or cable may press against your neck or ears as you move. It may also create a snag risk. Remove the headphones before sleeping unless the product is specifically designed and approved for that use.
Wearing them through sharp pain
Mild adjustment may be normal. Sharp pain, numbness, skin damage, or lasting soreness is not. Stop and reassess the fit.

Key Takeaways
- Place the neckband behind your neck.
- Match the left and right earbuds to the correct ears.
- Choose ear tips that seal gently without pain.
- Keep the cable slightly loose and free from clothing snags.
- Test sound, controls, and the microphone before use.
- Check the manufacturer’s sweat and water limits.
- Keep volume low enough to maintain awareness and protect hearing.
- Stop using the headphones if they cause pain or ongoing ear symptoms.
Frequently Asked Questions
Should neckband headphones go in front or behind your neck?
They should normally go behind your neck. This position keeps the band stable and lets the earbuds point naturally toward your ears.
Why do my neckband headphones keep falling out?
The ear tips may be too small, the wrong shape, or poorly positioned. Try another tip size, adjust the earbud angle, and check whether the neckband or cable is pulling on the earbuds.
Can I wear neckband headphones with glasses?
Yes. Place the band behind the arms of your glasses or adjust it slightly lower on your neck. The correct position depends on the shape of both the glasses and the neckband.
Can I wear neckband headphones while running?
You can use a model designed for movement if it fits securely and has a suitable sweat-resistance rating. Check the manufacturer’s limits, keep the volume moderate, and stay aware of traffic and other hazards.
Why does one side sound louder?
Check the left and right fit, clean the speaker mesh as directed, and review the device’s balance settings. A blocked earbud or an uneven seal can make one side sound quieter.
Conclusion
The correct way to wear neckband headphones is simple: place the band behind your neck, match each earbud to the correct ear, and adjust the ear tips until they stay secure without pain. Keep the controls easy to reach, test the sound and microphone, and follow the model’s care and water-resistance limits.
If the headphones still feel loose or uncomfortable, change the ear tip size before tightening the band or pushing the earbuds deeper. A stable, gentle fit is the goal.